Overview
The Problem
This tutorial will focus on solving some typical issues that can occur when using a cellular connection to access the Internet. Unless you have a cellular plan that provides a unique, statically assigned, publicly routable IP address (something typically only available to business accounts) you may face one or more of the following struggles:
- Connecting to or hosting certain multiplayer videogames
- Remotely monitoring security cameras and/or video recorders (NVRs)
- Streaming video from Plex, Emby, Jellyfin, or Channels DVR outside your home
- Remotely accessing local network devices and services
- Certain IoT devices (ex. Govee lights, MyQ garage door openers, etc.) randomly and/or frequently show they are ‘offline’ when checking their accompanying app
While it is true that the number of devices and services that require a static, publicly routable IP address are decreasing with each passing year, issues like the above along with many others not mentioned here can make having your own public IP very handy, improving your overall quality of life as a cellular Internet user. Without this, you will likely be accessing the internet through a shared IP address from your carrier which can introduce technical hurdles such as carrier grade NAT (CGNAT), IoT cloud server rate-limits, intermediary firewalls, and IP blocklists which may lead to the problems above.
The Solution
At a high level, there will be two main tasks required to configure this solution:
- Install and configure WireGuard on a cloud server which has a publicly routable IP assigned to it.
- Connect a pfSense WireGuard tunnel on your local network to the cloud server and use policy-based routing to selectively send traffic from LAN devices that need a public IP address, through the cloud server.
Assumptions, Requirements, & Limitations
- This guide assumes you already possess some networking knowledge and familiarity with terminology such as ‘routing’, ‘gateway’, ‘interface’, ‘NAT’, ‘port forward’, ‘DNS’, ‘proxy’, etc.
- It is assumed you have already installed pfSense (CE v2.5.2+, or Plus 21.02+) on bare metal hardware acting as the router/firewall with a basic LAN and WAN interfaces configured.
- You will need to have acquired a small cloud server or virtual private server (VPS) running Linux. Preferably a long-term support (LTS) Debian-based server distribution, ex. Debian or Ubuntu Server etc. as Ubuntu Server was used when creating this guide. When selecting a cloud server provider, it is recommended to choose one that natively assigns (or allows you to assign) a public IP address directly to the server.
While Oracle Cloud Infrastructure (OCI) is popular as they have a robust ‘free tier’ offering, they do not allow you to assign an Internet accessible public IP address directly to your server. Thus, in OCI, you will always add another layer of NAT which can be counterproductive, especially for our use case. If you must use OCI you may refer to this document which may prove helpful though it does not provide the full solution for our purposes. - The instructions in this tutorial are specifically targeted to solve the stated problems for specific network devices and services which benefit from having a public IP. The configuration outlined below will not send all traffic through the WireGuard VPN tunnel as this can create other issues with websites used by commercial video streaming platforms (ex. Netflix, Disney+, Hulu, etc.), banks, airlines, etc. as many of those block traffic originating from cloud server hosting providers. TL;DR: We are not using a VPN to achieve anonymity (in fact, just the opposite, actually).
- Instructions in this tutorial will cover IPv4 only.
- It is assumed that you have created static DHCP reservations for the pfSense LAN clients that will be receiving inbound traffic from the Internet or that will otherwise require the use of your cloud server’s public IP address.
Cloud Server Configuration
Disable Firewall Service
First, SSH in as ‘root’ to your cloud server and deactivate the firewall (‘systemctl disable ufw’) or at minimum ensure it allows inbound access to the default WireGuard port of 51820/udp on the interface which is assigned the public IP. Also, for security since we are not running the firewall, ensure that no other services besides ‘sshd’ are listening for inbound requests. We can verify this by executing ‘netstat -anp |grep ‘udp|tcp’ |grep LISTEN’. If the only service you see listening on the public IP interface or ‘0.0.0.0’ is ‘sshd’ then you should be okay to proceed.
If you see other services listening on Internet facing interfaces, you should disable them to secure your server from attack. Once we have WireGuard configured on both the server and pfSense endpoints we will later update the ‘sshd’ configuration so that it binds only to the WireGuard interface for security since we will be keeping the OS firewall disabled.
Install WireGuard
While you could manually install WireGuard, Nyr’s ‘wireguard-install’ script is much quicker and saves us the time in creating the necessary base configuration. A huge thank-you to Nyr for this excellent script! Execute the following command to download and run the installer:
wget https://git.io/wireguard -O wireguard-install.sh && bash wireguard-install.sh
The installer will ask for a few basic inputs like listening port, a client name, and which DNS servers you wish to use. The default port is usually fine, and we will name the client ‘pfsense’ for simplicity. I would recommend using a DNS server option other than the current resolvers that the cloud server provider is using. This can improve latency and reliability if the hosting provider is not already using something like Google or CloudFlare in their backend):
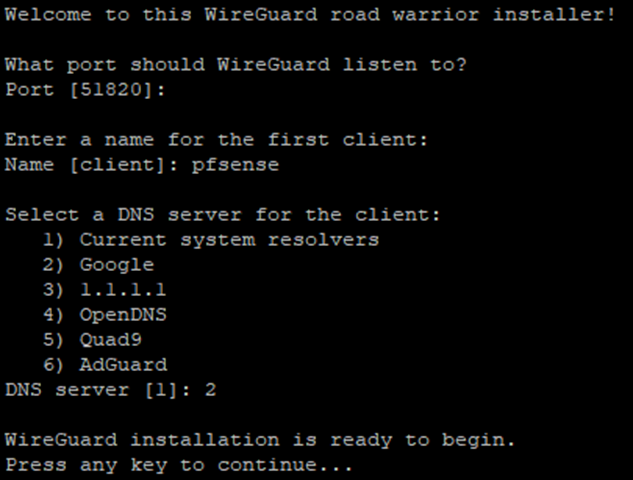
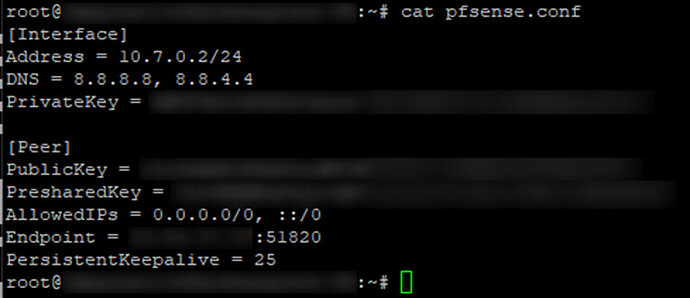
The installer will finish by displaying a QR code, but we will not need this to configure pfSense; instead, just ‘cat’ out the ‘pfsense.conf’ file and copy/paste the file contents into your favorite desktop note taking program for later reference when we connect pfSense to the cloud server tunnel:
You can run ‘wireguard-install.sh’ again as many times as you need to create additional client configurations for the WireGuard tunnel. I ran it one additional time to create a client configuration for my cell phone in which the QR code becomes quite useful (you can just download the WireGuard app on your phone and add the client configuration by scanning the QR code).
Add Traffic Redirection Rules
We will now edit stop the ‘wg-iptables ’ service using the command ‘systemctl stop wg-iptables ’, then edit ‘/etc/systemd/system/wg-iptables.service’ using our favorite Linux editor (‘vi’, ‘nano’, etc.) to remove or comment out (prefix lines with ‘#’) any ‘ExecStart’ and ‘ExecStop’ lines that have ‘ACCEPT’ in them; they are unnecessary since we do not have the firewall service enabled. This should leave only the lines that have ‘SNAT’ in them. ‘SNAT’ stands for ‘source NAT’ and is what performs most of the ‘magic’ of allowing our LAN clients under pfSense to use the cloud server IP as their own public IP.
At this point we will add ‘DNAT’ rules for any explicit ports we need to forward back to our LAN clients. ‘DNAT’ stands for ‘destination NAT’ and is what connects specific traffic inbound from the Internet back to the appropriate LAN client services. For clarity, the ‘ExecStart’ rules add each iptables rule when WireGuard is started and ‘ExecStop’ rules remove each iptables rule when it is stopped.
In my example I have two types of ’DNAT’ rules. The first type will include services that need to be open to the Internet at large. In my case this is Channels DVR (8089/tcp) which runs on an NVIDIA Shield connected to my local LAN but in your case maybe it is Plex (32400/tcp), etc.
The second type of ‘DNAT’ rule will include services that I only want accessed by other WireGuard clients connecting to the VPN such as my security cameras. This way, my Channels DVR will be accessible to everyone including family members who aren’t connecting to the cloud server via the WireGuard tunnel, while my security cameras will only be available to me via my phone while connected via the WireGuard tunnel. My full ‘wg-iptables.service’ file looks like this (where ‘XXX.XXX.XXX.XXX’ is the public IP of my VPS):
ExecStart=/usr/sbin/iptables -t nat -A POSTROUTING -s 10.7.0.1/24 ! -d 10.7.0.1/24 -j SNAT --to XXX.XXX.XXX.XXX
ExecStart=/usr/sbin/iptables -t nat -A PREROUTING -p tcp --dport 8089 -j DNAT --to-destination 10.7.0.2:8089**
ExecStart=/usr/sbin/iptables -t nat -A PREROUTING -s 10.7.0.1/24 -p tcp --dport 34566 -j DNAT --to-destination 10.7.0.2:34566
ExecStart=/usr/sbin/iptables -t nat -A PREROUTING -s 10.7.0.1/24 -p tcp --dport 34567 -j DNAT --to-destination 10.7.0.2:34567
ExecStart=/usr/sbin/iptables -t nat -A PREROUTING -s 10.7.0.1/24 -p tcp --dport 34568 -j DNAT --to-destination 10.7.0.2:34568
ExecStart=/usr/sbin/iptables -t nat -A PREROUTING -s 10.7.0.1/24 -p tcp --dport 34569 -j DNAT --to-destination 10.7.0.2:34569**

ExecStop=/usr/sbin/iptables -t nat -D POSTROUTING -s 10.7.0.1/24 ! -d 10.7.0.1/24 -j SNAT --to XXX.XXX.XXX.XXX
ExecStop=/usr/sbin/iptables -t nat -D PREROUTING -p tcp --dport 8089 -j DNAT --to-destination 10.7.0.2:8089
ExecStop=/usr/sbin/iptables -t nat -D PREROUTING -s 10.7.0.1/24 -p tcp --dport 34566 -j DNAT --to-destination 10.7.0.2:34566
ExecStop=/usr/sbin/iptables -t nat -D PREROUTING -s 10.7.0.1/24 -p tcp --dport 34567 -j DNAT --to-destination 10.7.0.2:34567
ExecStop=/usr/sbin/iptables -t nat -D PREROUTING -s 10.7.0.1/24 -p tcp --dport 34568 -j DNAT --to-destination 10.7.0.2:34568
ExecStop=/usr/sbin/iptables -t nat -D PREROUTING -s 10.7.0.1/24 -p tcp --dport 34569 -j DNAT --to-destination 10.7.0.2:34569
Finally, we will reload the ‘wg-iptables’ service using the command ‘systemctl daemon-reload’ and then start it using the command ‘systemctl start wg-iptables’ in order to activate the iptables rule changes we made in the service configuration.
pfSense Configuration
Install the WireGuard Package
If you haven’t already installed the WireGuard package to pfSense, do this now under ‘System > Package Manager > Available Packages’ by entering ‘WireGuard’ in the ‘Search term’ box and clicking ‘Search’. You can then install the package by clicking ‘+Install’. If successful you should now have a ‘WireGuard’ option in the ‘VPN’ menu heading:
Add a WireGuard Tunnel
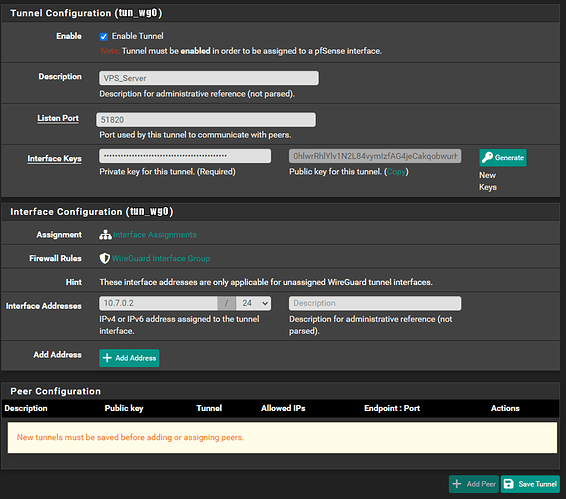
Under ‘VPN > WireGuard > Tunnels’ click ‘+Add Tunnel’. Ensure ‘Enable Tunnel’ is checked, fill in a ‘Description’, set the ‘Listen Port’ to 51820, set ‘Interface Addresses’ to ’10.7.0.2/24’, then copy and paste the Private key (the first box next to ‘Interface Keys’ and click ‘Save Tunnel’ and ‘Apply Changes’:
Connect the WireGuard Peer
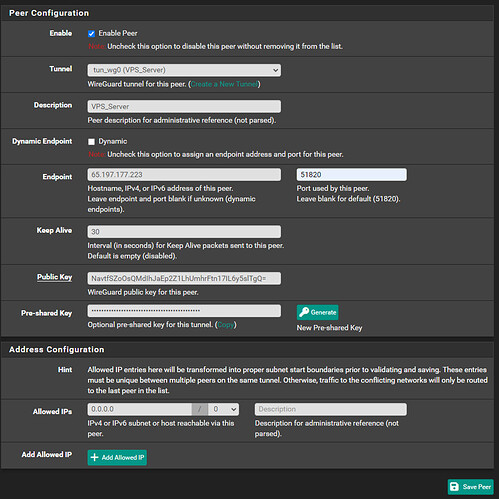
We will now add the peer configuration (which is our cloud server) by selecting the ‘Peers’ tab (just to the right of the ‘Tunnels’ tab) and clicking on ‘+Add Peer’. Ensure ‘Enable Peer’ is checked and select the tunnel you just created under ‘Tunnel’ dropdown. Uncheck ‘Dynamic Endpoint’ then populate ‘Endpoint’ with the cloud server IP and 51820 as the port. Under ‘Keep Alive’ enter ‘30’, paste the ‘Public Key’ and ‘Pre-shared Key’ from your server notes, then set ‘Allowed IPs’ to ‘0.0.0.0/0’. Click ‘Save Peer’ then ‘Apply Changes’:
Assign the WireGuard Tunnel to an Interface
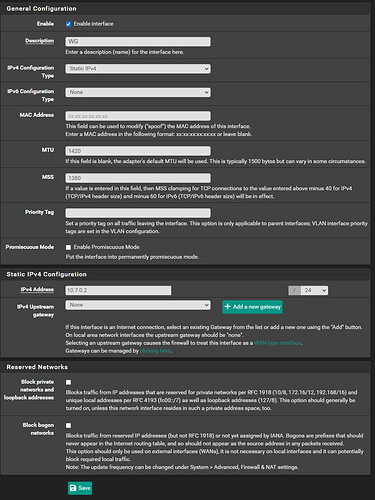
We will now assign an interface to the tunnel by selecting ‘Interfaces > Assignments’ from the header menu. You will see the newly added tunnel as an interface in the bottom-most dropdown, click ‘+Add’, then click on the new ‘OPTx’ name to edit it (where ‘OPTx’ is the automatically generated interface name, ex. ‘OPT3’):
Ensure ‘Enable’ box is checked, update the interface name to something concise but meaningful like ‘WG’. Set ‘IPv4 Configuration Type’ to Static IPv4, ‘MTU’ to 1420, ‘MSS’ to 1380, and ‘IPv4 Address’ to 10.7.0.2/24. Click ‘Save’ and ‘Apply changes’:
Assign a Gateway
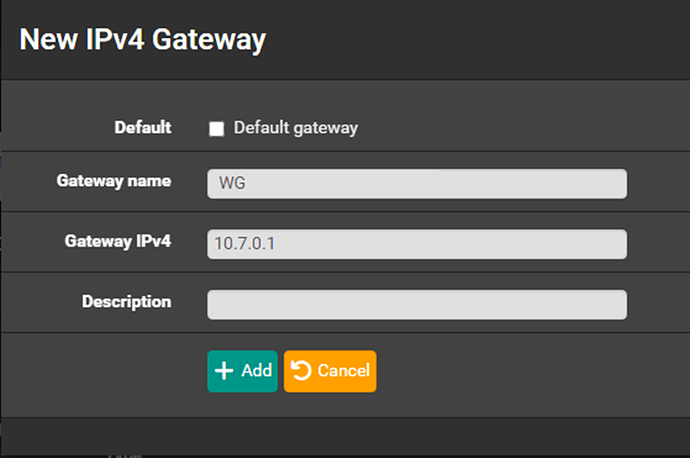
From the same interface properties screen after changes are applied, click ‘+Add a new gateway’ and enter 10.7.0.1 as the ‘Gateway IPv4’ value and click ‘+Add’:
Then click ‘Save’ and ‘Apply changes’ again.
Test Ping Between pfSense and Cloud Server
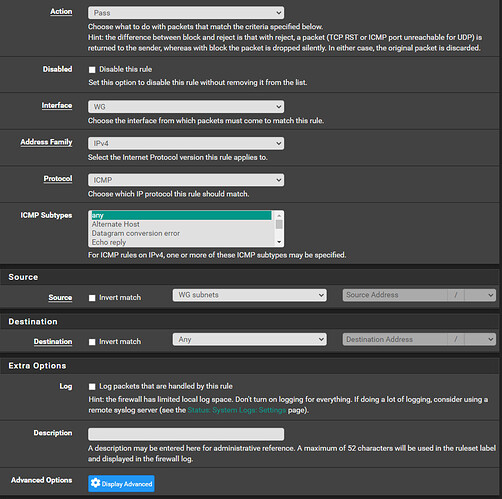
To test, we will start by adding a firewall rule that allows ping (ICMP) between the cloud server and pfSense in either direction. Navigate to ‘Firewall > Rules > WG’ (or whatever you have named your WireGuard interface) and click ‘^Add’ then add the following rule, click ‘Save’, and then ‘Apply changes’ afterward:
The rule in the rules list should look like this:
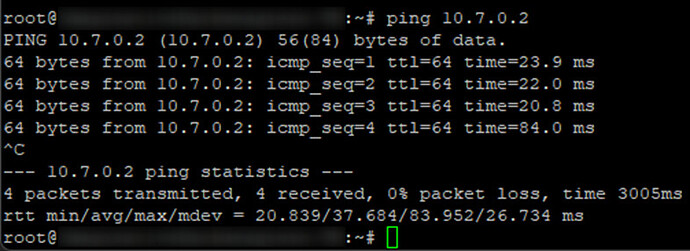
Now pings from the cloud server to the pfSense WireGuard tunnel IP should get replies:
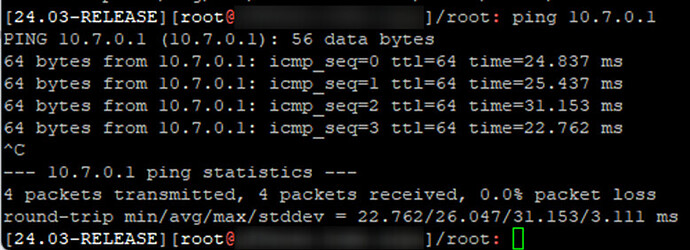
Pings from pfSense to the cloud server should also be successful:
If pings are not successful, go back and check the configuration of the tunnel, peer, interface, gateway, and firewall rule allowing ICMP (ping) on the WireGuard interface are all correct.
Add Manual Outbound NAT Rule
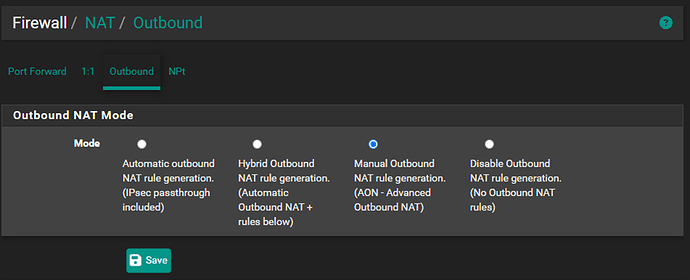
With the basic tunnel established we can now proceed with the rest of the firewall configuration beginning with outbound NAT. Navigate to ‘Firewall > NAT > Outbound’ where we will change the ‘Outbound NAT Mode’ to ‘Manual Outbound NAT rule generation’ (you could also select ‘Hybrid Outbound NAT rule generation’ as well if you wanted to keep the automatic ruleset while we add the ones for our WireGuard interface manually but I prefer the granular control of all rules which makes for less guessing during troubleshooting). Click ‘Save’ and ‘Apply changes’:
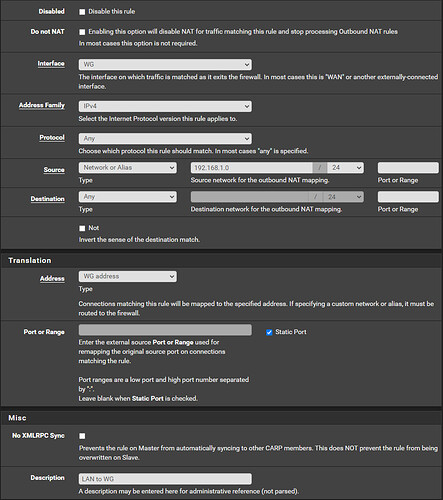
After making this change you will now notice that the ‘Mappings’ section has been populated with a list of rules for the outbound NAT on your existing WAN, you can leave those alone, we will just be adding new rules for the WireGuard interface by clicking the ‘Add’ button with the downward arrow (this ensures the rule we add is below any existing rules for the WAN). The rule should look like this (replace 192.168.1.0/24 with your actual LAN subnet if different than pfSense default):
Make certain you have checked ‘Static Port’ next to the ‘Port or Range’ box. This is important to ensure that any LAN clients we send through the WireGuard gateway will communicate back on the same ports requested from their peers. Specifically, this will help in establishing a mostly open NAT for gaming devices. Click ‘Save’ then ‘Apply changes’. You should now see the following rule below the existing rules for your WAN:
Create Aliases
At this point we will create firewall aliases for LAN hosts in preparation for the creation of our Port Forward rulesets. Establishing firewall aliases is important for two reasons, the first being that we can assign multiple IP addresses to a single alias which simplifies firewall rule creation. The second reason is that referring to destination hosts by alias names will make any troubleshooting of firewall rules much easier when we are looking at the rule definitions.
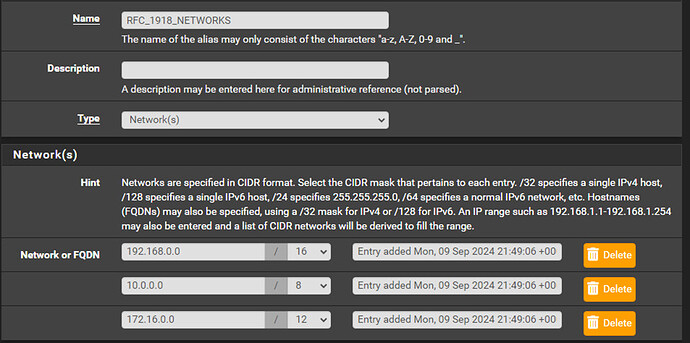
To create new aliases, navigate to ‘Firewall > Aliases’ and click ‘+Add’. First, we will create a rule defining RFC 1918 networks (local class IP addresses) which will make creating later firewall rules easier (ex. we can create ‘inverted’ rules that direct all traffic not destined for a local subnet, i.e. the Internet, through a specific gateway like our WireGuard gateway). Under the ‘Network or FQDN’ section you need to click ‘Add’ twice so we can define three total networks in this alias:
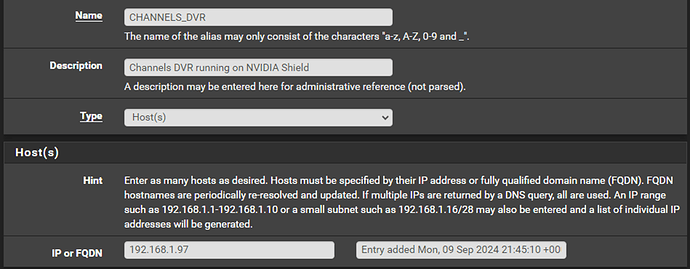
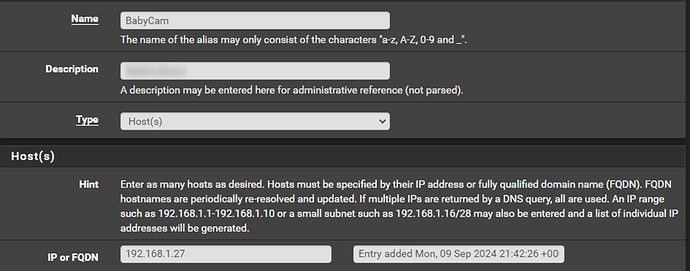
Click ‘Save’ and ‘Apply changes’. Now we will create aliases for our LAN destinations that we want to receive Port Forward traffic from starting with our Channels DVR server followed by my network cameras. If you haven’t set static DHCP assignments for the LAN clients that will be receiving inbound traffic from the Internet, you should do that before creating these aliases to ensure the aliased IPs don’t change at some point due to DHCP lease expiration and renewal. After creating each alias click ‘Save’, then ‘Apply changes’ when you have added the last one. For brevity I am including only one example screenshot for the cameras as each rule for those is essentially the same thing with only the name and IP changed for each one:
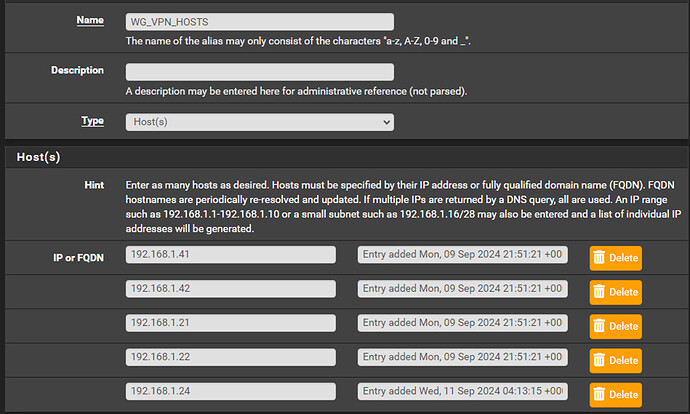
Now we will create an alias for all clients that will need to go through the tunnel to use the cloud server public IP. In my case this will be my IoT devices from Govee and MyQ, and my Nintendo Switch gaming systems (you can reference the IPs that you have already assigned statically under ‘Services > DHCP Server’ then scroll all the way down to ‘DHCP Static Mappings’):
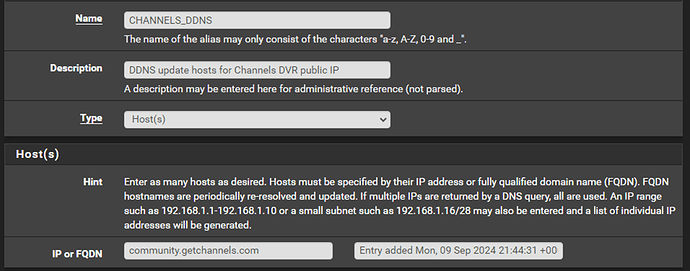
Finally, I will add a URL based alias for my Channels DVR server in preparation for creating a firewall rule later in this document that ensures the server will always exit the WireGuard gateway thus reporting the public cloud server IP to the Channels DVR cloud. In theory you could just set the current resolving IP address(es) to the relevant domain but in reality, this can cause problems if the IPs for the domain change (this is frequently the case if a site uses CloudFlare etc.):
Create Port Forward Rules
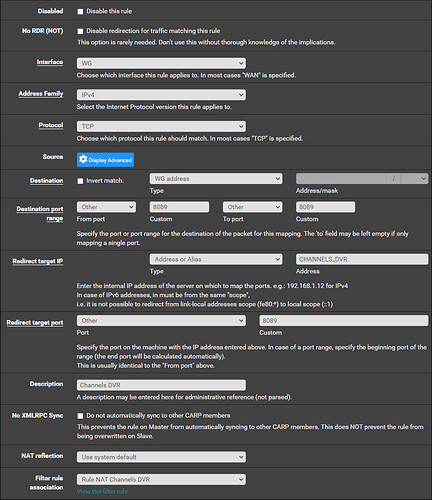
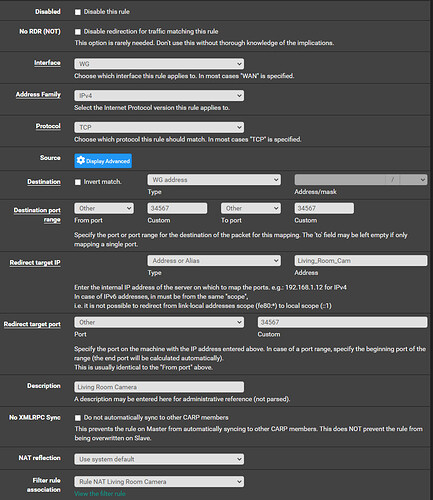
Now we can move on to creating our Port Forward configurations and accompanying rules. Navigate to ‘Firewall > NAT > Port Forward’ and click ‘^Add’. We will start with the port forward for Channels DVR in this case:
Now for the network camera rules. For brevity, I will only post one as an example, they are all the same except for updating the ‘Redirect target IP’, ‘Address’ alias and ‘Port’ to match the desired camera target on the LAN:
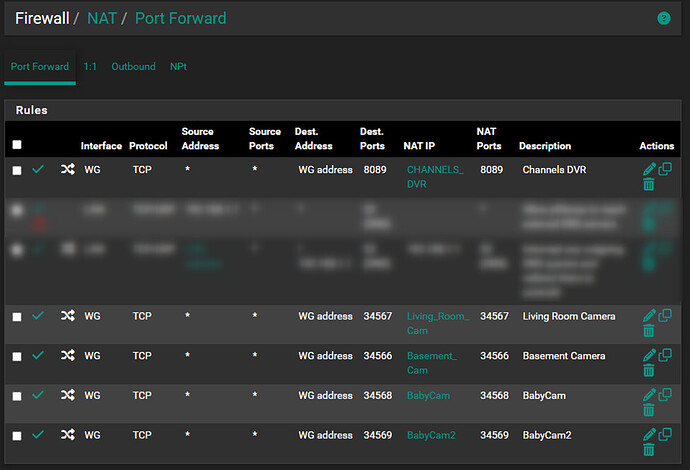
Click ‘Save’ after creating each one then ‘Apply changes’ when done with the last one. When finished, you should have a port forward rules list that looks like this:
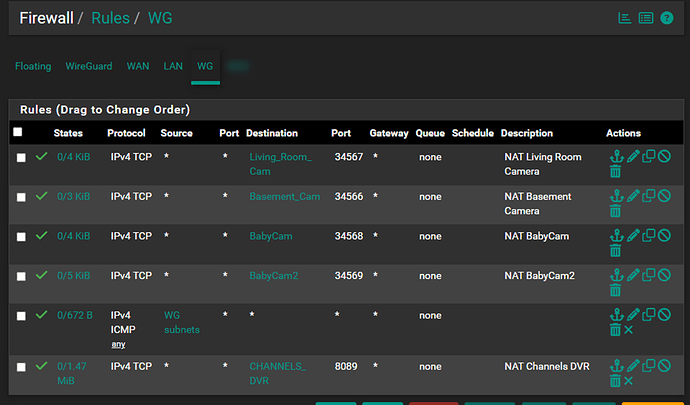
Navigate to ‘Firewall > Rules > WG’ and you should see accompanying firewall rules were created to allow the traffic for every Port Forward rule you created, if not, you need to go back to the port forward rule and ensure that the auto rule creation setting is enabled:
Create LAN Rules
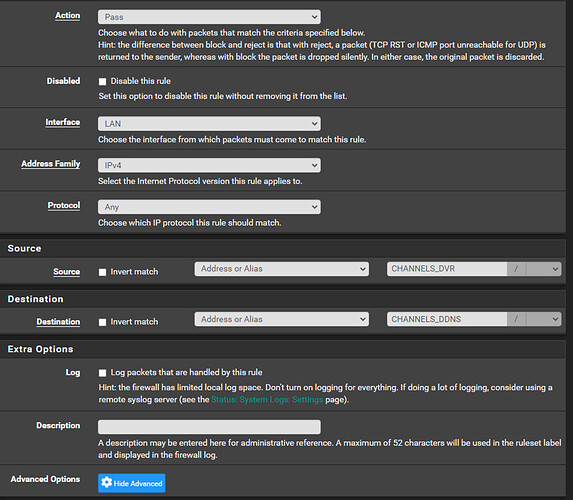
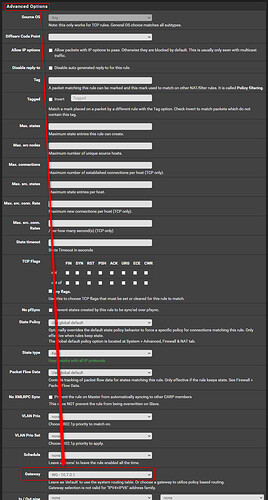
Now we need to create outbound LAN rules for clients that will be using WireGuard as their gateway (using the cloud server public IP address). Navigate to ‘Firewall > Rules > LAN’ and click ‘^Add’ to create a new rule at the top of the existing LAN rules. This rule will be the one for Channels DVR mentioned earlier to ensure that any traffic from the Channels DVR server to their cloud leaves the WireGuard gateway to ensure the Channels DVR cloud servers always see the public IP address from our cloud server:
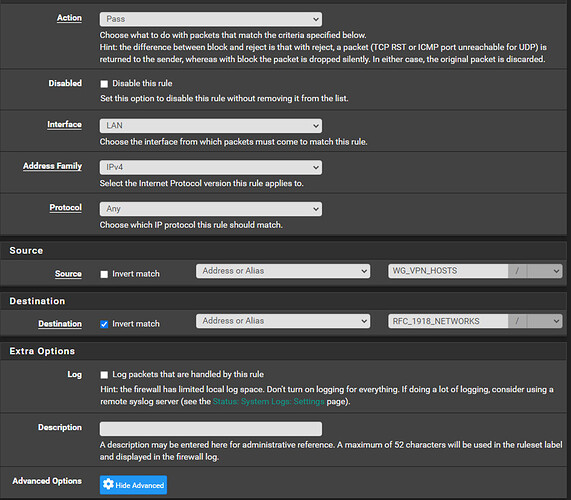
Click ‘Save’ then add a rule to ensure all the hosts that need our public IP from the cloud server are using the WireGuard gateway. This is the one where we will use the ‘Invert match’ option on the destination and set it to the alias we created for RFC 1918 networks. This way all the traffic not destined for a local subnet (i.e. the Internet) will use the WireGuard gateway:
Secure SSH Access to the Cloud Server
Now that we have completed the WireGuard tunnel configuration between pfSense and the cloud server, we can secure SSH access to the server so that SSH is no longer accessible from the wider Internet. This is highly recommended and will allow the cloud server to operate in ‘stealth’ mode so that any port scans executed against the server by bad actors will not yield any results.
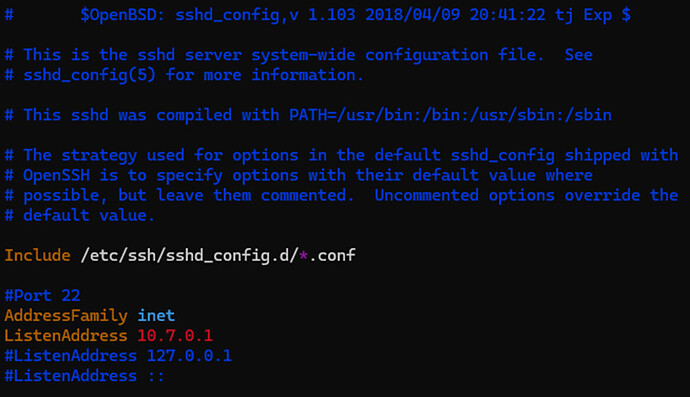
To accomplish this, we SSH to our cloud server as ‘root’ and modify the file SSH daemon configuration file ‘/etc/ssh/sshd_config’ using your favorite text editor to set ‘AddressFamily’ to inet and ‘ListenAddress’ to 10.7.0.1 (the local WireGuard tunnel interface). Be sure to save these changes in your text editor. For the change to take effect you will need to restart the SSH daemon using the command ‘systemctl restart sshd’.
This effectively locks SSH access to incoming connections from WireGuard tunnel peers only. Now you will only be able to access the cloud server via its WireGuard IP address (10.7.0.1 in this case). In case of any issue with underlying cloud server network connectivity in the future where the WireGuard tunnel is unable to come up for some reason, the only other way of connecting to the server would be utilizing your hosting provider’s console access which typically consists of connecting to an out-of-band IP address using VNC. Check your provider’s documentation for more information.
Testing & Validation
Reset the Firewall States Table
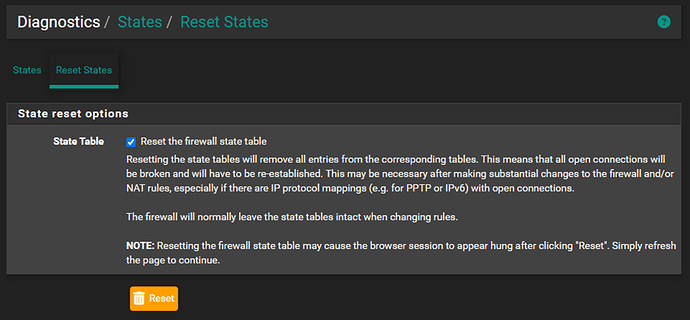
That’s it! To test we will start by resetting the current firewall states so that everything is forced to use our new rules. Be aware that this may temporarily disconnect devices from the internet as any established firewall connections are dropped and new connections are established using our updated Firewall rulesets. After this, you will need to wait a few seconds and click refresh on the pfSense web page to reload it. To clear the current states, navigate to ‘Diagnostics > States > Reset States’, check the ‘Reset the firewall state table’ checkbox, then click ‘Reset’:
Checking Device Connectivity
Now we can check our devices to ensure they are using the cloud server’s public IP. The best way to test will depend on the device. For a PC or Mac you can simply perform a Google search for ‘what is my IP address’ and scroll down to the ‘What’s my IP’ box and your IP will be listed just above the ‘Your public IP address’ descriptor. You can also visit a site like https://icanhazip.com which will show you the IP without any other text on the page.
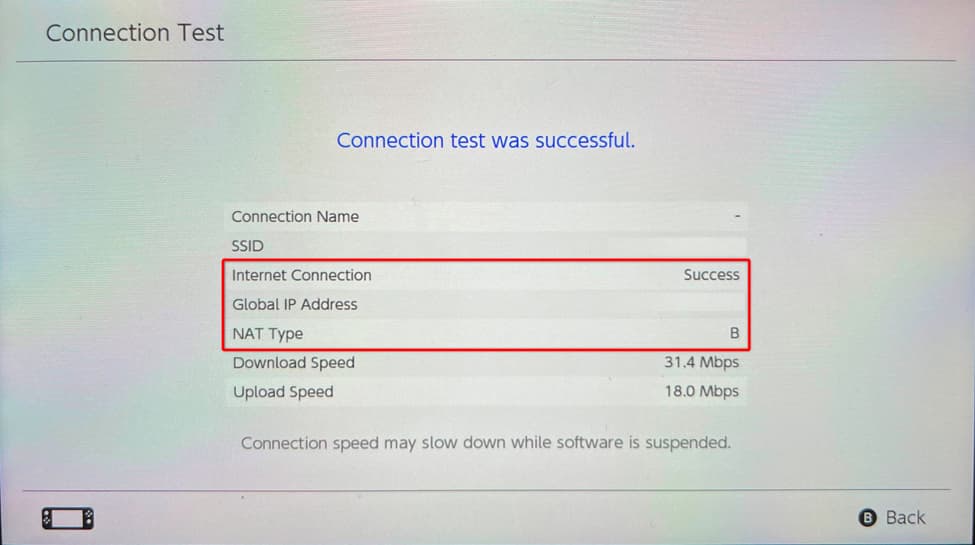
For gaming systems, most offer an Internet connection test that shows the public IP and current NAT type. Below is a photo from one of my Nintendo Switch systems for reference:
Video streaming servers like Channels DVR and Plex typically have ‘Status’ sections of their dashboard which will tell you if your server is externally accessible. Here is my Channels DVR status as an example:
